Showing posts with label tutorial. Show all posts

Saturday, June 22, 2013

Replacements for your Google Reader and Importing to Bloglovin'

DSC_0348

With Google Reader headed out on July 1st, I thought I'd tell you all my two favorite options for replacements. Because you want to keep getting those two faces, right? And really, I have been using one of them for years over reader anyway. Insert shocked emoticon here!


This is where it's at my friends. They're already well established and who the majority of bloggers are pushing for too. Their interface is clean and similar to Google Reader so you won't feel like you're in a totally new situation either.

I'll walk you through transferring Google Reader! It's EASY.

Sign up, or sign in. Then head on over to the Bloglovin' transfer page. Just follow the prompts! It's very straightforward. And aren't you glad you get to see all my crazy tabs? This is parred down too. If you know if any 12 step programs for quitting excessive tabbing..


Ta-Da! Enjoy your new stress free reader. Be sure to add Thinking About Pretty. They have apps for iPhone and Android too! And they're great.

If you're really really against Bloglovin', there is also a new reader out called Feedly that seems promising. If you use that, let me know!

Sunday, September 4, 2011

fabric wrapped bracelets


I've had these for a while but I just am getting to them. They are so quick and fun and can cost you nothing depending on your on-hand supplies. My fabrics were a cotton gingham, a dobby floral, and a menswear suiting piece. They were all left over scraps I had around. Don't use suiting though, it frays horribly! These aren't meant to last years or anything, but after even one wear that suiting is coming to pieces-so avoid. :)


supplies:
sewing machine or needle and thread
plastic bracelets (I thrifted these two for a $1)
1" strips of fabric
a dry double-sided adhesive (this is what I used)
mini glue dots for touch ups


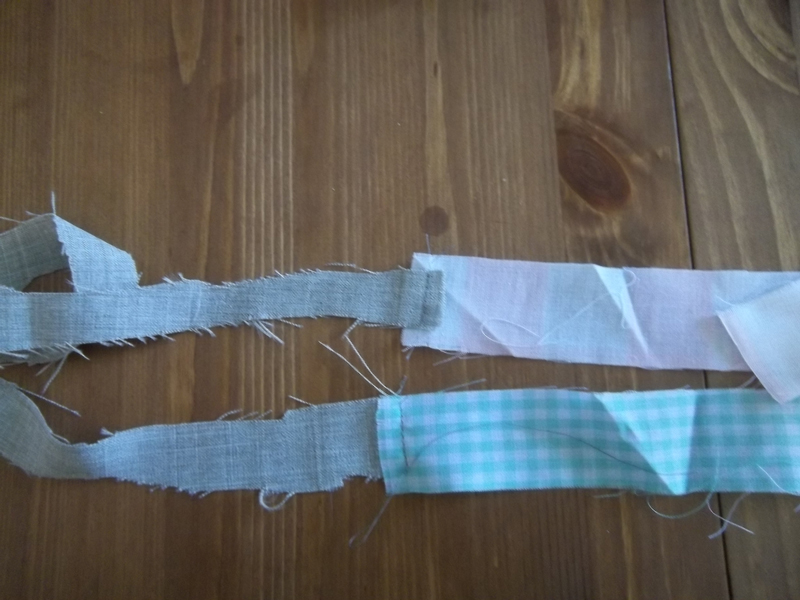
step 1: Attach fabric strips together with sewing machine. Hand stitch if you don't want to haul out the machine or don't have access to one. I used three different strips in the example and two on the other in the photo. Experiment with your fabrics! Try wrapping the bracelet first just to see if you like the spacing and length of the fabrics. Adjust accordingly.


step 2: Place adhesive on rim of bracelet and be generous.

step 3: Attach sewn strip and slowly start wrapping. Add adhesive on inside and outside as you go. 


step 4: Inspect and use glue dots as spot checks for places that may be coming up. See how mine has a little bubble? Finish off and tuck fabric end into a spot on the inside rim.


stack them and love! Feel free to ask any questions and I'd love to see yours if you make them too. :)

Friday, August 13, 2010

Make it Cool

Tutorial time is here again! That one I said I would have up last week...well, husband got a new job! In his field! Hooray! But we're had some schedule re-adjusting and so I'm trying to get back into my groove. Sorry for the wait!

Today we're going to be making a long sleeved sweater into a short sleeved one! Simple, no? Well, it was a lot simpler whenever my Mom helps me. Because Mom's seem to just know everything therefore: simpler!

We based our sewing off of Disney's Not Your Grandmother's Cardigan, which is a great reference for this.

supplies:
sweater whose sleeves you constantly roll up
sewing machine
cutting mat
rotary cutter
ruler
thread
pins!

step 1: using your ruler, line up edge right along seam of your ribbed cuff. make a clean cut.

step 2: decide how far down you want your sleeve to hit. however: a few things to keep in mind before you make another cut.

your cuff is a smaller diameter than your sleeve will be. try sliding the cuff up your arm and see how far up comfortable still is. don't make it too short or you'll have ring arm imprints by the end of the day. no fun.

also, remember to add the cuff length into your equation, minus a 1/4"-1/2" total for seam allowance. so, from my shoulder, I measured down 4 1/2", plus my 2" cuff which makes it 6 1/2" long. minus 1/2" or less for SA, which takes it down to about 6". still with me? :)

now cut 4 1/2" down (or however long you want the sleeve) and grab that cuff.

step 3: right sides together, pin the cuff to your cut sleeve. you can gather it with a basting stitch beforehand if you like, but that will give you a puffy sleeve like Disney's. my shoulders need no help getting noticed, so my pining was more tucking and folding around so the sleeve would lay flat.

step 4: set your sewing machine to a zig zag stitch. be sure to use a zig zag because this will allow your sleeve to stretch as you move. a straight stitch is no good here! sew close to the edge.

step 5: trim excess edge from your new zig zag stitch.

step 6: repeat steps 1-5 for other sleeve, being very aware of your measurements. Check and recheck to make sure everything is even. If your sweater is older be especially careful since one sleeve may be stretched farther than the other.

step 7: cut loose threads, flip right side out and bear the office cold and summer heat like a champ! And then take a final picture at work because you forgot to take one at home. :)

linked at Favorite Things Friday + Get Your Craft on Tuesdays

Tuesday, July 13, 2010

Whipped to Perfection

We have some incredibly generous neighbors and friends who have been very, very kind to us lately. Way above and beyond the call of neighborly duties I would dare say. Even though it's small, I wanted to give them something to show them how appreciative we are. Enter raspberry butter. It couldn't be easier but boy it tastes wonderful on fresh bread.

supplies:
1 stick butter (1/2 cup)
1/2 cup raspberry preserves (or maybe a little more)
food processor
spoon
spatula
canning jar (what I used)


step 1: place equal parts butter and raspberry preserves in food processor.


step 2: cover and blend until fully mixed. you may have to open it and move around the butter a few times to get it completely blended. add more raspberry preserves if desired.

step 3: now that it's whipped to perfection, put the raspberry butter into a canning jar. this recipe fits perfectly inside an 8 oz. swirl a little bit of raspberry preserves on the top just so they get extra excited when they open it the first time.

step 4: punch out a 1" circle from cardstock and ever so smally write raspberry butter. it's a long word so keep it tight. then wrap your bread and go thank your friends! Oh, and don't forget to make extra for yourself. It's seriously all I've had for dinner for two nights now. Yum.

Try other flavors too! Mix and match; get creative. Tell me what delicious flavor combos you come up with. And I've got a little something arranged for the end of the week that you'll want to come back for! It involves percentages...think about it. :)

Saturday, July 10, 2010

Slipp-ery


Here's a super quick weekend project for you on this beautiful Saturday; hem your slip. I have put up with mine for about 2 years too long, so I finally did it and now I'm kicking myself for not doing it sooner. I'm wearing more skirts all of sudden...funny how that works!


supplies:
slip
matching thread
sewing machine
rotary cutter or scissors
cutting mat
ruler


step 1:
line up the bottom front of the slip with your lines on the cutting mat. (in my photos the bottom is the right side) place ruler two inches (or however much you need) up from the hem. my slip is translucent which made lining up the ruler easy. draw a line if you're worried about being able to trim it off straight after.

step 2: carefully cut along your line. Repeat steps 1 + 2 for back side.

step 3: iron a small hem fold so it stays when you sew! your material will not play nice if you don't-promise.


step 4:
sew a straight stitch along your ironed edges, being sure to do any finishing work you see fit. and yes, sometimes I sew on the floor. :)


Step 5: check out your clean corners! trim any excess you have from your finished edge. now go out and be modest!

Thursday, July 1, 2010

Poufy Pretty

I love decorating for holidays, but the 4th of July has always been hard for me. Everything is a little too cheesy...but I wanted color! So I whipped up three cute wallflowers with help from Made. I love how they turned out! Here's some steps to mine.

For a blue pouf..

step one: I didn't have any blue tissue paper or napkins on hand, so I grabbed my handy dandy Azure Chartpak (available at art stores and Hobby Lobby) and went to work on eight 20"x30" tissue paper pieces, which is the standard size. I didn't worry about the stripes being even; they look better freehand anyway!

step two: Patiently fold accordian style up from the bottom, about 1" to an 1 1/2". Your tissue should be tall rather than wide.

step three: Wrap a thin floral wire around the middle a few times to secure. Trim the two ends like a pointed flower tip.

step four: Unfold to make a two sided fan.

step five: Starting with the top layer and working your way in, gently pull the layers upward. My first layer was pretty much vertical so don't worry about doing it too much.

step six: fluff and enjoy! You can just do it so that it sits on a flat surface, or pull apart the bottom layers to create a full hanging pouf.

Now, onto a red pouf which uses napkins like Made! Napkins are amazing for these because they are so sturdy but they still look soft and lovely.

step one: Unfold and layer 4 napkins. Mine started out as 5"x5" christmas napkins from the Michaels $1 bins! Add one large and flattened cupcake liner to top.

step two: fold accordian style upward every 3/4" to an 1" wide. And don't mind my scary finger vein! Wow.

step three: Wrap middle with floral wire. Trim ends to make a soft wave.

step four: Peel apart layers, making sure to pull each of the two or three layers apart that your napkin has. Extra fluff!

For the first pouf on our door I used four 6"x6" pieces of blue striped tissue paper, one red striped napkin and a cupcake liner. Layering is the way to go with these for sure! It's so fun to see all the different ways you can combine them. I think I'm officially addicted to wallflowers.

So how do you decorate? Are you a simple decorator, or do you go all out even for smaller events like the 4th?

linked up at The Shabby Nest

Monday, June 28, 2010

Summer Cardigan

Do you ever buy a shirt that you are in love with, but doesn't love you? That is this shirt and I. The heather gray stripes took me to a place that when I put it on, I didn't noticed the 6 month pregnant look that also came along for the ride. When buyers happiness settled down, I was left with something that I kept not wearing. I don't need extra help with my love handles thank you very much.

So this weekend as I looked at the shirt that's been hanging there since probably last summer, I thought I'd try something. A summer cardigan, if you will. Because I love sweaters as much as cookie dough. That's a lot, if you're not my husband and don't see me noshing away at it all the time! Yum.

Here is a little tutorial to go along with my blah to drape front cardigan transformation! Now, I am not a professional seamstress or photographer...love me anyway? Thanks.

step 1: grab your shirt, a cutting mat, a rotary blade or scissors, and all sewing machine tools. Yeah, all that other stuff is outside of this picture. My bad!

step 2: find your center and cut directly down. Be sure not to cut the back side of your shirt! fronts only, please. Check out your handiwork so far:

It's open! Already so much better. But square. Let's fix that.

step 3: iron and or pin your raw edges. Try to make sure they are as even as possible or you'll be looking weird walking down the street. (left is inside and right is outside in the picture).

step 4:
using a basic straight stitch, go along the edge of your drape with your machine. be sure to do a little finishing stitch on the bottom!

step 5: trim excess fabric.

step 6: make sure those stitches are looking wonderful.

step 7: wear and have a love-love relationship with your shirt again!

Any shirt will do for this; long sleeves, short, none, whatever! I like a little bit of sleeve and now I really like this cardigan. And guess what? That necklace was $3 at the DI. Awesome refashioning and thrifting all over.

linked up at Today's Creative Blog